No products in the basket.
Getting Started
Control Surface Studio is a powerful desktop based application designed to make building MIDI Remote Scripts for Ableton Live as easy as possible.
Any new tool however, requires some getting used to so we have created this set of detailed documentation in order to provide you with all of the information you need.
If you are not able to find the answer to a question in here, you can post it in the Forum or send us a message via the Contact Form.
Video Tutorials
We have a collection of video tutorials on our youtube channel, which cover everything from getting started, fixing broken scripts to advanced usage with our Reactions mapping type.
Click here to see our full list of video tutorials on youtube >>> Control Surface Studio Video Tutorials
Video: User Interface Changes between 2.7 & 2.8
We overhauled our user interface in version 2.8 so the layout may look different in some tutorials (we’re working on this). But rest assured, the concepts remain exactly same!
This video explains the UI changes between 2.7 and 2.8

Video: Getting started (Official Remotify.io tutorial) :
In this video we give you an overview of using Control Surface Studio.
Please note that this uses 2.7, see our video on UI changes between 2.7 and 2.8 for details on the changes.

Video: Midi script not showing Ableton Live?
If you have created an Ableton script with Control Surface Studio but it isn’t showing in Ableton Live’s list of Control Surfaces, this is usually due to one of two reasons:
1. The script is being installed to the wrong location/version of Ableton 1:19
2. There is an error in the script 2:21
In this video we go through how to check and fix these common issues.

Video: How Does Control Surface Studio improve Ableton Live MIDI mapping?
Jannis Le Wolff walks through the limitations of using Ableton Live for MIDI mapping and how Control Surface Studio improves this

Changelog
Details of updates to Control Surface Studio can be found in the changelog.
FAQs
You can find a list of FAQs here.
Requirements
In order to use the Control Surface Studio Application, you will need
- A Computer running either MacOS or Windows operating systems
- A connection to the Internet.
- A Remotify user account which you can setup for free at registration page
Installation
You can download Control Surface Studio from the product page without needing to purchase it. You will be required to enter login details in order to access it. Use the registration link above to create an account.
Once the download is complete, in your downloads folder you will see one of the following:
- ControlSurfaceStudioApple.dmg (Mac M1/M2/M3)
- ControlSurfaceStudioIntel.dmg (Mac Intel Chip)
- ControlSurfaceStudioSetup.exe (Windows).
Double click on this and follow the onscreen instructions to install the Application as you normally would for your Operating System.
Installation Troubleshooting
If you get an error when trying to install the application, please see our Installation Troubleshooting page.
Account Registration
In order to access the Control Surface Studio application, you must have a Remotify.io user account which can be created here.
Forgotten Password
If you have forgotten your password, you can reset it here.
Updates
To use the Control Surface Studio App, we recommend that you use the latest version available.
When you launch the App, if a newer version is available you will see the message ‘An update is available’ with links to download the update and to the changelog.
Click the download link to immediately download the latest version to your computer. Once download is complete, install the new version and delete the old one.
All script, controller template and settings are stored separately to the application, and will be available when you open the new version of the application.
Purchasing a Licence
In order to generate midi remote scripts into Ableton Live using Control Surface Studio, you will first need to purchase the full version here: Remotify.io/product/control-surface-studio.
Section tabs

After logging into Control Surface Studio. You will see the following tabs across the top: My Scripts, My Controller Templates, On Remotify, Tutorials.
Clicking each tab will change the view to that section.
My Scripts
This is where all of your midi remote scripts are found.
Please note: we may refer to ‘midi remote scripts’ as ‘scripts’ for short, throughout this documentation.
In the ‘My Scripts’ section, you can do the following:

Add a new script
To add a new blank script, click the ‘Add new’ button. A pop up box will appear where you can name the script.
Clicking ‘add’ will create the new script and it to the ‘My Scripts’ section.
Clicking ‘add & open’ will so the same, but will also open the new script in the script editor. Clicking ‘cancel’ will cancel the creation of the new script.
Import a script
Clicking the Import button will open the import pop up browser, where you can search for a script json file on your computer to import into the My Scripts section.
(All scripts which were originally created using Control Surface Studio will have a json file included in its folder).
Scripts
Scripts (short for midi remote scripts) contain all the configurations for all of the custom Ableton Live functionality. They also have a controller template attached which contains the MIDI data for a specific midi controller.
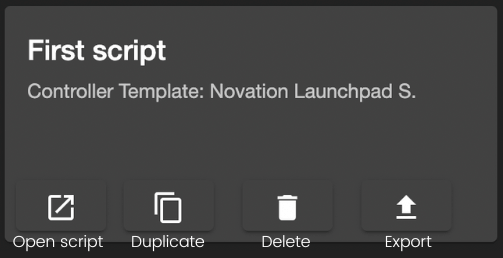
Each script in the My Scripts section has the following buttons:
Open Script
Clicking this button will open the script in the script editor.
Duplicate script
Clicking the duplicate button, will duplicate the script. You will see the duplicated script appear immediately in the My Scripts section.
It will be renamed to include ‘(copy)’ at the end of its name.
Delete script
Clicking the delete button will delete the script json file from Control Surface Studio, removing it from the My Scripts section in the process.
(note, this won’t effect any scripts previously generated into Ableton Live).
Export script
Clicking the ‘Export script’ button will open the save pop up.
Set a name and location to export the script json file to.
My Controller Templates
This section is where all of the controller templates are found.
’Controller templates’ are configuration files for physical midi controllers.
A single controller template is used for storing all MIDI data for a single midi controller.
Scripts are used to assign Ableton Live functionality to the inputs of a controller template.

Add a new controller template
To add a new blank controller template, click the ‘Add new’ button.
A pop up box will appear where you can name the template.
Clicking ‘add’ will instantly create the new template and it to the My Controller Templates section.
Clicking ‘cancel’ will cancel the creation of the new template.
Import a controller template
Click the ‘Import’ button to open the import pop up browser, here you can find and select a controller template json file on your computer to import into the My Controller Templates section.
Controller templates
Controller templates are stored separately to scripts. They are used to store all of the MIDI data for a single midi controller.
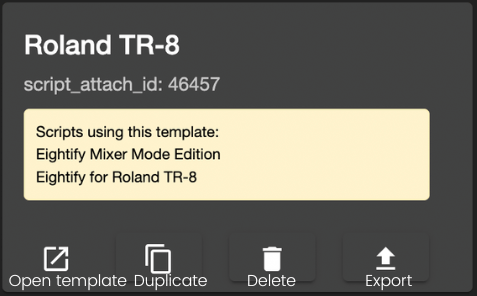
Each controller template available in the My Controller Templates section displays the following information:
Name: the user configurable name of the controller template
script_attach_id: internal id for the template
Scripts using this template: lists all scripts from the My Scripts section which currently the template assigned to it.
Each Controller template has the following buttons:
Open template
Clicking this button will open the controller template in the ‘template editor’.
Duplicate template
Clicking the duplicate button will duplicate the template. You will see the duplicated template appear immediately in the My Controller Templates section. It will be renamed to include ‘(copy)’ at the end of its name.
Delete template
Clicking the delete button will delete the template json file from Control Surface Studio, removing it from the ‘My Controller Templates’ section in the process.
Export template
Clicking the ‘Export template’ button will open a save pop up. Set a name and location to export the template json file to.
On Remotify
The ‘On Remotify’ section contains scripts and controller templates which are available online via our server.
These be can imported directly into the My Scripts and My Controller Templates sections.
Click one of the tabs below the title ‘On Remotify.io’ in order to see all of the scripts/templates which are available to import.
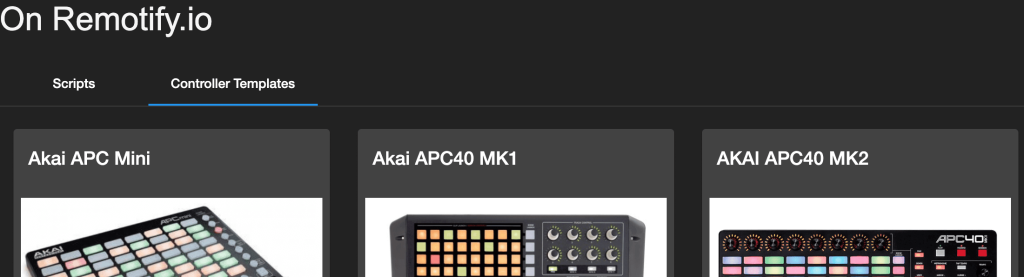
Each script/template has the following buttons:
Details
If available, clicking the details button will open the webpage for the script/template where you can read further information about the item.
Import
Clicking the ‘import’ button will import the script or template directly into the My Scripts or My Controller Templates sections.
Prices
If available, clicking the ‘prices’ button will open a webpage where you can purchase the script or midi controller.
Tutorials
The ‘Tutorials’ section provides links to tutorials (written or video) where you can learn more about specific aspects of using Control Surface Studio.
The Left Column
After logging in you will see a column on the left side which contains the following:
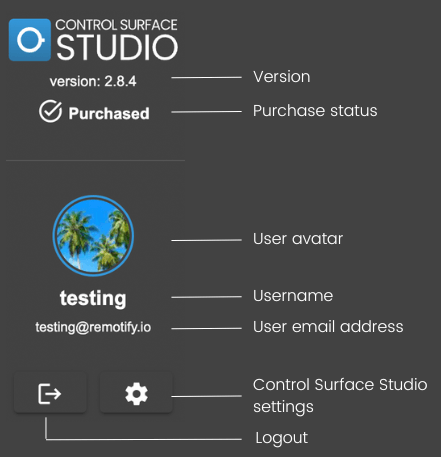
Version number
Displays the current application version number which you are using.
Purchase status
If you have purchased Control Surface Studio, you will see a tick and the word ‘purchased’.
If you haven’t purchased it, you will see the message “Get full access”, clicking this text will take you to the Control Surface Studio product page.
User details
This displays details of the logged in user, including their Avatar, username and email address. User details can be edited by logging in to your user account on the Remotify.io website.
Logout
Clicking the logout button will immediately log you out of Control Surface Studio.
Control Surface Studio settings
Clicking the ‘CSS settings’ button will open a pop up. Here you can set the various locations which Control Surface Studio uses and also turn some settings on/off.
The following video walks through applying the correct settings so that MIDI remote scripts will generate into Ableton Live correctly from Control Surface Studio.


Ableton Live Application Location
This is where the location of the Ableton Live application is stored on your computer.
Click the magnifying glass on the right to open the browser. Navigate to and then click the Ableton Live application, then click ‘open’.
This will then automatically set the file path to Ableton live in the text field.
Live Version Folder Location
The Live version folder is where Ableton Live stores various files for each minor version of Ableton live, such as the log.txt file.
This field should auto populate when you select the Ableton Live application location field above. If it doesn’t or the location is incorrect, you can click the magnifying glass button on the right to open the browser and set the correct location.
MIDI Remote Script Folder Location
The location of the ‘MIDI remote scripts’ folder used by Ableton Live.
When you set the Ableton Live application location above, this field should automatically populate with the correct folder location.
If not, you can click the magnifying glass button on the right to open the browser and set the correct location.
Manually setting this location:
- For Windows users:
\ProgramData\Ableton\Live x.x\Resources\MIDI Remote Scripts\ - For macOS users:
- Locate the Live application in Finder (typically
/Applications/), - right click on it and select “Show Package Contents” in the context menu,
- navigate to:
/Contents/App-Resources/MIDI Remote Scripts/
- Locate the Live application in Finder (typically
Ableton Live Version
If the Live Version Folder Location is set correctly, then this menu will be populated with all of the minor versions of Ableton Live.
It’s import to set the correct minor version of Ableton Live which you are currently using. The Log monitors the log.txt file for whichever minor version you have selected here.
Python Version
This sets the version of Python which Control Surface Studio will generate your midi remote scripts with.
It’s important that this is set to the correct version in order for your script to function.
However, it should automatically change when you select a new version in the Ableton Live version field.
Log.txt Location
The location of the log.txt file which you want Control Surface Studio to monitor in the Log.
When you change the Ableton Live version, the file path should automatically update to match the major/minor version of Live which you have selected.
You can also click the magnifying glass button on the right to open the browser and set the correct location.
Display Grid
When checked, the grid is displayed in the controller template editor.
Disable ‘Are you sure’ confirmation popup
If unchecked, whenever you delete anything in CSS such as a script or mapping, an ‘are you sure’ confirmation popup will appear before the item is deleted.
If this setting is checked, items will be deleted immediately without needing to confirmin first.
Cancel/Save
If you click save, any changes you have made to the settings will be stored. If you click cancel, any changes you have made will be removed.
The Script Editor
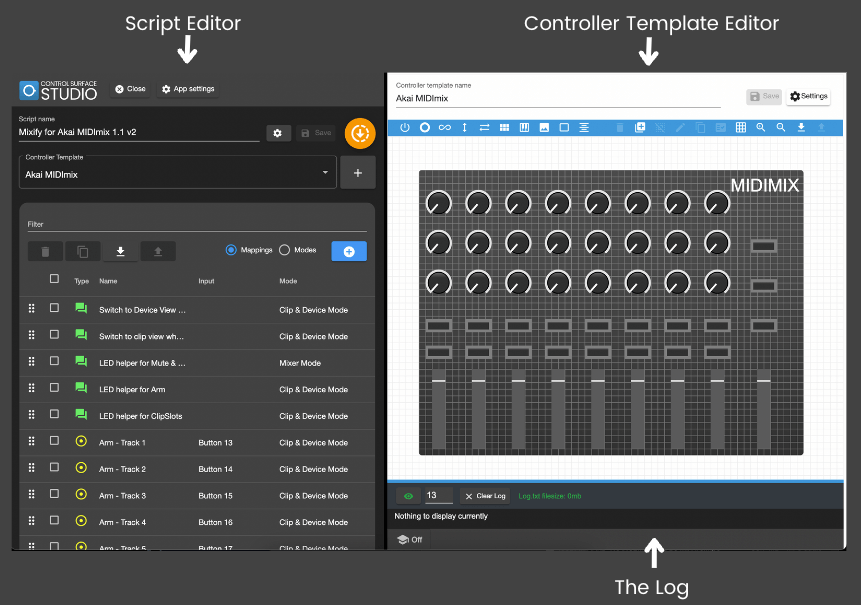
The script editor consists primarily of 2 columns.
The left column is the main script editor, where all of the script details and mappings are managed.
The right column contains an instance of the controller template editor.
This displays whichever controller template is currently assigned to the script (see the controller template selection menu).
The bottom section of the right column also contains the Log and midi information (when MIDI learn is turn on).
The columns can be resized by clicking and dragging the divider left/right and the same for the log (by dragging up/down).
Note: for the rest of this section, we will refer to the left column, simply as Script Editor.
Script Editor
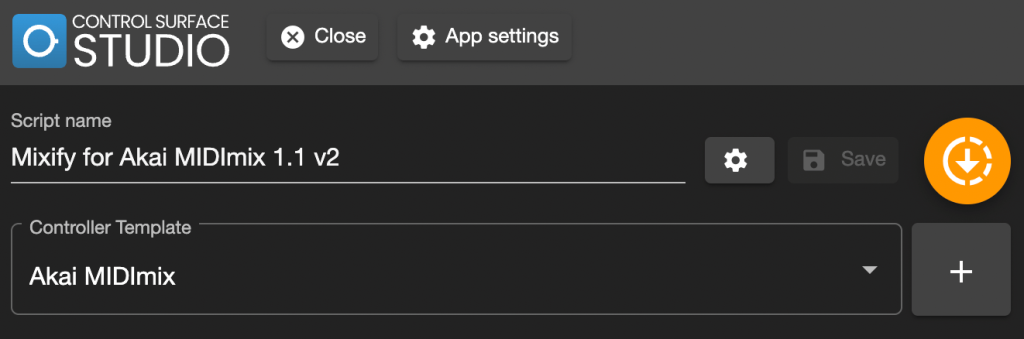
Close button
Clicking this will close the script editor. If you have unsaved changes a pop up will display asking if you want to ‘close without saving’ or ‘go back’.
App settings
Clicking the app settings button will open the settings pop up. (See the section on Control Surface Studio settings for details).
Script name
Here you can edit the name of the script.
Script settings button
Clicking this button will open a form which contains settings specific to the script.
Save button
Clicking the save button will save any changes to file. Making a change in the script doesn’t automatically save it to file. When you have unsaved changes, this button will be highlighted.
Generate script into Ableton Live button
Clicking this button will generate all of the required midi remote script code/files and put it in Ableton Live’s midi remote script folder.
Ensure that you set the correct midi remote script folder location in the Control Surface Studio settings.
Activating your script in Ableton Live
After successfully generating your script into Ableton Live and restarting it. To activate your custom script in your Ableton Live, do the following:
In Ableton Live, go to preferences > MIDI.
In the control surface column, open a select list and find your script.
All scripts created by Control Surface Studio are prefixed with “css_”.
For example, if you named your script “My first Script”, it will be named “css_my_first_script” in Ableton Live’s preferences.
This ensure that the default midi remote scripts are not overwritten.
After selecting your script, then select the MIDI Controller/keyboard from the Input and output select lists on the same row.
Then for the MIDI ports options below, set ‘track’ and ‘remote’ to ‘on’ for your MIDI Controller/keyboard’s input and output.
Note: whenever you make changes to your script, Ableton Live will need to be restarted in order to see the changes.
Controller template selection menu
Select the controller template which will be used with the script.
The list contains all of the controller templates which you have added in the My Controller Templates tab.
When a new controller template is selected, it will display in the right column’s controller template editor and its inputs will be available to assign to mappings in the script.
You can add a new blank controller template to the script by clicking the plus button next the menu.
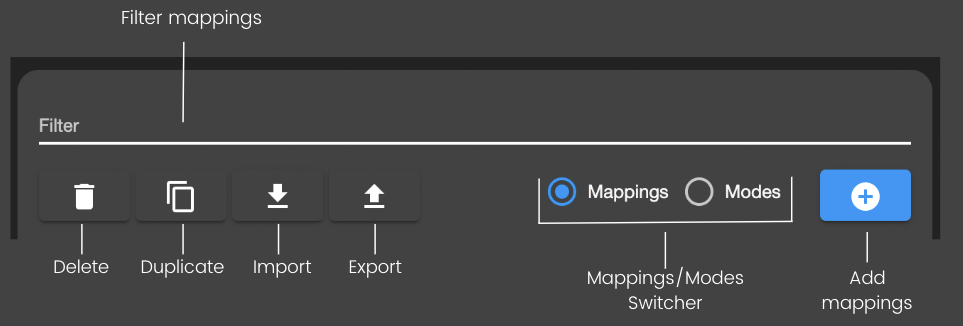
Filter mappings
Here you can filter the list of mappings.
Delete checked items
Clicking this button will delete any mappings which are checked in the list below.
Duplicate checked items
Clicking this button will duplicate any mappings which are checked in the list below.
Import items
Clicking this button will open the browser popup. Select a script json file and click open, all of the mappings and modes contained in the file, will be imported into the script.
Export items
Any checked mappings and modes can be exported to a script json file. The button will be become active when there are checked mappings or modes in the list below.
Mappings/Modes switcher
Switch between the list of mappings and the list of modes.
Add mapping menu
Clicking this will open the ‘add mapping’ menu. The menu contains all of the mapping types which are available to add to the script.
Mappings
Each individual mapping in the list has its own set information/functions.
Also note that clicking the mapping will open a pop up containing its settings form.

Drag & Drop handle
Click and drag this to move the mapping to a new position in the list.
Check box
Click to check/tick the mapping. Checked items can be deleted/duplicated/exported using the controls mentioned above.
Mapping type icon
Displays the mapping type icon and the mapping type name when hovered over.
Mapping name
The editable name of the mapping
Mapping’s assigned Input
The selected controller input from the currently assigned controller template (which is displayed in the controller template editor).
Mapping’s assigned Mode
The mode which the mapping is set to.
Tags
The editable tags which have been assigned to the mapping.
Modes
The available modes can be viewed by clicking the mappings/mode switcher.
Modes are used to group mappings into ‘pages’ of mappings which can be switched while using the script via the ‘mode selector’ mapping type.
Drag & Drop handle
Click and drag this to move the mode to a new position in the list.
The mode at the top of the list will be activate when the script is first enabled in the Ableton live session.
Check box
Click to check/tick the mode. Checked items can be deleted/duplicated/exported using the controls above.
Mode name
The editable name of the mode
Tags
The editable tags which have been assigned to the mode.
Mapping settings form
The settings form of a mapping can be accessed by clicking the mapping in the list.
Each section in the mapping popup form can be shown/hidden by clicking its name.

Section: Mapping Name and notes
Name The editable mapping name
Tags Set tags which mappings can be filtered by in the script manager. Type the tag name then click return to set it
Notes Enter helpful notes about the mapping here.
Mode Select the mode which the mapping will be set it. The list of available modes are taken from the mode view in the script editor.
Section: Controller input
Select Input The ‘select input’ menu contains all the inputs which are available in the attached controller template (displayed in the controller template editor).
Control Override
The control Override option enables you to override the controller template’s default ‘control type’ functionality.
When set to default, control settings from the attached controller template input are used.
Setting it to ‘custom override’ displays a group of override options.
Why override default Controls? Overriding controls gives you the ability to change how the physical inputs on your MIDI Equipment interact with parameters inside Ableton Live for individual mappings.
For example, you can change the physical buttons on your midi controller to act like incremental/decremental knobs, gradually moving an ableton parameter up/down instead of the default on/off functionality.
Control Type
Set how you want the physical input on the midi controller to behave, regardless of its default type (button/knob/encoder etc).
Absolute
Inputs which send MIDI Message Values from 0 – 127.
When this option is selected, 2 further options are displayed below it, first and last.
First / Last options
Used by the ‘Absolute’ control type to set the MIDI velocity value range which the mapping will listen for. It’s important to note that ‘First’ must be the lowest value & ‘Last’ is the highest.
Example, you are creating a Volume mapping and you only want to use a part turn of your physical knob’s complete turn range.
If your knob has a velocity range starting at 0 (turned all the way to the left) and ending at 127 (turned all the way to the right), you could set this mapping to only use a portion of the range such as First: 0 and Last: 63.
The volume mapping would now move from 0db to 6db in Ableton Live with only a half turn of your Knob.
Invert values
Used by Absolute controls to reverse/invert the direction of the control.
Takeover Mode
Used by Absolute Controls. mimics Ableton Live’s internal Takeover mode, except that here you can set it per control.
Relative
Inputs which send a single value continuously while turning the input left and another single value when turning right/up. Example: when turning an encoder to the left it continuously sends the MIDI velocity value of 20. When turning to the right it continuously sends the MIDI velocity value of 80.
Left / Right options
Set the left/right MIDI velocity values which the mapping will listen for.
On/Off
By default, on/off MIDI buttons can send MIDI data in 2 different ways, depending on how the physical MIDI Controller is configured. If it is Momentary button, a MIDI ‘on’ velocity value is sent when the button is pressed down, then an ‘Off’ value is sent when the button released.
If it is a Toggle button, an ‘on’ MIDI velocity value is sent on first press. Then an ‘Off’ value is sent on second press.
On and off will alternate with each press. You can change a button to behave like either a momentary or toggle button for the specific mapping by using the switch type option (see below).
It’s important to note that this does not change the configuration of your Physical Controller.
Steps
Used by Relative, Increment & Decrement control types.
It is used in different ways depending on the Mapping Type which is being configured. For example, with mappings that have Value Ranges such as Volume, Sends, Pan, Device Parameters, ‘Steps’ refers to the amount that the Ableton parameter will move for each button press/knob turn, and is calculated by the total range divided by the number of steps that you have set.
For navigation type mappings such as Track/Scene Navigation, the step number is the number of tracks/scenes to move by with each press/turn.
Switch Type
Used by On/Off, Increment & Decrement Controls to handle when a mapping should fire.
Note that a matching On or Off value must first be received by the script before this point is reached in the execution process.
Momentary
Will fire only when the ‘On’ value is received.
Toggle
Will fire when ‘On’ or ‘Off’ is received.
Delay
Will fire only when the time between receiving the ‘On’ Message and ‘Off’ Message is greater than the value set in ‘Delay Amount’.
Delay Amount
Sets the delay amount (in seconds) to listen for. 0.5 equals half of a second delay. Only available when ‘Switch Type’ is set to ‘Delay’.
Increment & Decrement
Increase or decrease the current value of an Ableton Live parameter. Useful for controls inside Ableton Live which have value ranges such as Volume, Tempo, Sends, Device Parameters etc and Navigation type Mappings such as Highlight Navigation and Session Box Navigation.
Usually can be used in combination with the ’Steps’ field to set the amount in which the control increments/
Section: Track selection
Mapping types which are located inside a track in the Ableton Live session will have configuration options for ‘track selection’. Here you can set which track the mapping relates to.
Track Type Set the type of track : track (all tracks in the main mixer portion of the Ableton Live session). return (all return tracks in the Ableton Live session), selected (the currently highlighted track in the Ableton Live session), master (the master track).
Track number If track or return is selected for Type you can select a track number here.
Use modifier Instead of using an exact number for the Track number above, checking the ‘Use modifier’ box displays a menu containing all of the available ‘modifiers’ which can be selected instead.
Modifiers are value holders/variables which can be dynamically set using the Reactions mapping type. (see modifiers for more details on this).
Relative to Session Box position If a Session Box is active on the same mode and you have selected ‘Yes’ for this option. Then your track number will be relative to the current position of session box, meaning it will automatically update with the Session Box.
If you set this to ’No’ then the track selection will always stay the same regardless of the session box position.
Include folded tracks If ‘Relative to Session Box position‘ is set to no, this option will appear. Setting it to ‘Yes’ means that the ‘Track number’ count will include folded tracks.
Section: Device selection
Mapping types which are located inside a device in the Ableton Live session will have this settings section.
Chain Targeting In the Ableton Live session, devices can be nested within other ‘Device Chains’ such as with the Audio Effect Rack. If the device you want to target is contained inside parent device chains, you can use the Chain targeting section to select it. Clicking the blue plus button will add a new device chain level. ‘Device’ is the parent device number and ‘Chain’ is the chain number within the device which you want to select. You will then select the device number in the chain using the options below: ‘selected or device number’ and ‘Select device number’.
Selected or device number Set this to ‘number’ or ‘selected’ depending on if you want to target a specific device number in the device chain or the currently selected device in the chain.
Select device number Set the device number in the chain in the chain which you want to target. Checking the ‘user modifier’ box allows you to use a dynamic modifier value.
Section: Snapping
Snapping on/off Used in combination with a mapping type’s Minimum & Maximum settings (only some mapping types have this).
If the Ableton Live parameter is positioned outside your Minimum/Maximum settings and snapping is turned on, when you move your physical control, the parameter will first snap to either min or max then continue moving as normal.
If snapping is turned off then the parameter will only move if it is already positioned inside your Minimum/Maximum settings.
If it is outside the minimum/maximum settings, then the parameter in the Live UI will not move when you move the physical control on your MIDI Controller.
Controller Template Editor

Controller templates are used to store the MIDI data related to each physical input of a specific midi controller.
The template editor displays a graphical representation of the midi controller with all of the inputs laid out.
Controller template name
The editable name of the controller template, usually named to match the midi controller which it is used for.
Save
Click this button to save changes you have made to the controller template. The button will become active when there are unsaved changes.
Controller template settings
Clicking the settings button opens a popup form which contains controller template specific settings.
Notes
Here you can write some helpful notes about the controller template
Grid settings
Set the total height and width of the controller template grid aswell as the size of each individual square in the grid. (note that the grid must be set to display, in order to see it).
Default controller LED values
Set the default on and off MIDI velocity values which will be sent the midi controller from the script during use of the mapping.
The controller template menu bar
The menu bar is split into 2,
The left side contains all of the input types which can be added to the template.
The right side contains all of the template tools which can be used to edit/manage the template.

Controller input types
Container: The container Input type is purely for visuals in the MIDI Controller Area. Use it to draw the rectangular shape of your MIDI Controller.
Knob: A circular Input which can be a Control Type of either Absolute or Relative.
Endless Encoder: Works exactly the same as ‘Knob’ inputs types, the only difference is how it is displayed visually in the MIDI Controller Area.
Slider (fader): A rectangular Input which be a Control Type of either Absolute or Relative. Crossfader: The same as a Slider by in a horizontal position.
Pads: This input type creates a group of (pad) inputs. The number of pad inputs contained in the group can be changed in the input type’s settings.
Keys: This input type creates a group of (key) inputs. The number of key inputs contained in the group can be changed in the input type’s settings.
LED Display: Use this for ‘output only’ type components on your MIDI Controller which only receive / display data. They do not send any data to Live.
Text: Use this to add titles and notes to the MIDI Controller Area. This is purely for your own visual references and does not get used in Live.
Endless Encoder: Works exactly the same as ‘Knob’ inputs types, the only difference is how it is displayed visually in the MIDI Controller Area.
Adding an input to the template
To add a new input to the controller template, click one of the input types in the left side of the menu bar. Your selection will appear on the grid below.
How to open the settings form for an input
To open the settings popup form for an input, hover over the input and click the small pencil icon which appears. Each input contains the following settings:
Name User configurable name for the input.
Notes Here you can include any handy notes related to the input
MIDI message settings A MIDI Message is the data which MIDI Controllers send and receive. Enter the MIDI Type, Channel and Value which the physical input is set to. If the midi learn button on the left is turned on, when you move/press the input on your midi controller, the MIDI data will be automatically entered for you.
Velocity control settings Set the control type and the midi velocity values which are sent when the physical input is moved/pressed. (If MIDI learn is turn on, the last received velocity value will be displayed above)
Control Types
It is important to set the correct Control type and other information for an input. It should match the exact same data sent by the Physical Controller for the input.
Absolute
Sends MIDI Message Values from 0 – 127.
Relative
Sends a single value continuously while turning the physical input left/down and another value when turning right/up.
On/Off
On/Off buttons can work in 2 different ways depending on how your MIDI Controller is setup. If it is Momentary, a MIDI Value is sent when the button is pressed AND when released.If it is a toggle, an ‘on’ MIDI Value is sent on first press, then an ‘off’ Value is sent on second press.
You can also set ‘Momentary/Toggle’ in ‘Switch Type’ (see below). note: this does not change the configuration of your Physical Controller, check the User Manual for the Controller to do this.
For example, setting your Switch Type to ‘Momentary’ can mean that functionality only fires when an ‘on’ value is received, compared to ‘Toggle’ which will cause functionality to fire when both ‘on’ and ‘off’ are received.
First / Last
Used by the ‘Absolute’ Control Type to set the complete value range that your script listens for.
It’s important to note that ‘First’ must be the lowest value & ‘Last’ is the highest.
Here it is possible to only use a portion of your Physical Input’s complete range meaning, for example if you only want half of your Knob to control a Volume, you can set the range as First: 0 and Last: 63. The Volume will now move from 0db to 6db with only a half turn of your Knob.
Invert
Used by Absolute controls only. Reverse/invert the direction of the control.
Takeover Mode
Used by Absolute Controls. mimics Ableton Live’s internal Takeover mode, except that here you can set it per control.
Left/Right
Used by Relative Controls to set the left/right MIDI Values which your script listens for.
On/Off
Used by On/Off, Increment & Decrement Control Types to set the on and off MIDI Values that your script listens for. The Mapping will fire only when these Values are received.
Number of steps
Used by Relative, Increment & Decrement Control Types.
It is used in different ways depending on the Mapping Type. For example, with mappings that have Value Ranges such as Volume, Sends, Pan, Device Parameters, the amount that the control moves with each button press/knob turn is calculated by the total range divided by the number of steps that you have set.
For navigation type mappings such as Track/Scene Navigation, the step number is the number of tracks/scenes to move by with each press/turn.
Switch type
Used by On/Off, Increment & Decrement Controls to handle when a mapping should fire.
Note that a matching On or Off value must first be received by the script before this point is reached in the execution process.
Momentary
Will fire only when the ‘On’ value is received.
Toggle
Will fire when ‘On’ or ‘Off’ is received.
Selecting inputs /multiple inputs
An input can be selected by clicking it with the mouse cursor.
Multiple inputs can be selected by either holding cmd/ctrl and clicking more inputs or clicking on an empty space and dragging the blue square over multiple inputs.
Moving inputs
An input can be moved on the grid by first clicking to select it, then clicking it and dragging. Multiple inputs can be moved by first selecting multiple inputs (see above), the clicking on them and dragging.
Changing the size of inputs To change the size of an input on the grid, hover over the input and you will see a small arrow appear in the bottom right corner, clicking it and dragging will increase the size.
Controller Template Tools
The right side of the bar contains various tools for the template…
Delete selected inputs
When at least 1 input is selected on the grid, this button will become active. Clicking it will delete all selected inputs.
Select all inputs
Clicking this button will select all inputs in the controller template.
Deselect all inputs
Clicking this will delete all selected inputs
Bulk edit selected inputs
With at least 2 inputs selected, clicking this button will open the ‘bulk input editing’ popup form. Here you can bulk update various settings for all of the selected inputs.
Duplicate selected inputs
With at least 1 input selected, clicking this button will duplicate all selected inputs. Duplicated inputs will appear to the right of the selected inputs.
Selected inputs list
When clicked, it will display the names of all selected input in a popup.
Inputs can be deselected here by clicking the cross next to the input name.
Show/hide grid
Clicking this button will show and hide the grid lines.
Zoom in / Zoom out
Use the zoom in and out buttons to increase and decrease the size of the controller template grid and inputs.
Import inputs
Clicking the ‘import inputs’ button will open the file browser popup.
Select a controller template json file and click open.
All inputs in the file will added to the current controller template.
Export selected inputs
With at least 1 input selected, clicking this button will open the save file popup. Clicking save will save all selected inputs to a new controller template json file.
The Log
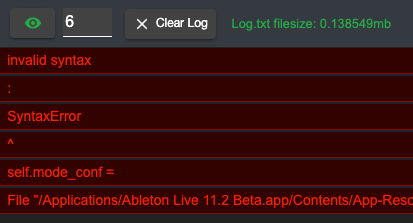
The Log displays errors generated by Ableton Live in red and messages added using the Reactions mapping type in green.
These errors/messages help with building scripts as they are great for finding and debugging issues in any MIDI Remote Scripts.
For the Log to function correctly, you must set the correct location of the log.txt file in the ‘Control Surface Studio settings > log.txt location’.
The height of the log can be increased / decreased by clicking and dragging its top border.
Log watching
Click the Log watching button (eye icon) to turn watching of the log on and off.
If the eye icon of the button is green, that means the application is actively watching the log.
Display last x number of log items
Set the number of last generated log items to display here.
Clear log
Click the clear log button in order to delete the contents of the log.txt.
Log.txt filesize
This displays the current file size of the log.txt file.
As Control Surface Studio continuously monitors the log.txt file, a large log.txt file can impact the performance of the app, so we recommend periodically clearing this using the clear log button.
The log display
Errors and messages are displayed in this area.
The number of log entries displayed is defined using the ‘Display last x number of log items’ above.
Errors generated by Ableton Live are displayed in red. Messages generated using the Reactions mapping type in your script are displayed in green.
Midi Learn On/Off
Below the log is the button to turn MIDI learn/ MIDI monitoring on and off.
When on, the names of all connected midi devices will be displayed along with the last received midi message.
MIDI Monitoring is used to listen to MIDI messages transmitted by any MIDI devices which are connected to your computer.
Reloading MIDI Remote Scripts inside Ableton Live
Seeing changes to your MIDI remote script can be done in a number of ways.
- All versions: Close and re-open Ableton Live
- Ableton Live 9 & 10: Reloading the current Ableton session also reloads the MIDI remote scripts
- Ableton Live 11 and 12: Use a Beta version of Live and add the Tools > Reload MIDI Remote scripts menu option. Full details of how to do this can be found in the article Instantly Reload MIDI Remote Scripts in Ableton Live.