No products in the basket.
When software ‘normalizes’ a piece of audio, it finds the loudest point in the audio (or ‘peak’). If the peak is -3db for example, normalizing will bring the entire audio recording up by 3db, so the highest peak now sits at 0db.
If the peak was already sitting at over 0db, normalizing will bring the recording down to 0db. The process raises or lowers the entire piece of audio as a whole, meaning quieter parts of the track will remain relative to the peak, it won’t increase everything individually.
This is done without affecting the dynamics of the recording (i.e. Without coloring the sound), which using a limiter and compressor will do.
In this article:
- Does Ableton have a normalise option?
- Does Ableton individually normalize each session track?
- Should I normalize to 0db?
- Does normalizing slow down track exporting?
- Should I normalize audio when exporting?
- Considering ‘Noise Floor’ when normalizing
- Bonus tip: How to normalize an individual clip in Ableton
- Bonus tip 2: How to normalize MIDI velocity in Ableton
- Can I use a Compressor and Limiter as an alternative to normalizing?
- Pros and Cons of using a Compressor and limiter to normalize audio
- What is Clipping?
- Alternatives to using Ableton’s Normalize option
- Pro Tip: Using an external Editor for normalizing with Ableton Live
- Wrapping Up
Does Ableton have a normalize option?
Yes, Ableton Live does have a normalize option. You will find it during the process of exporting your project to a file.
Normalizing is done in Ableton by clicking file > export Audio/Video.
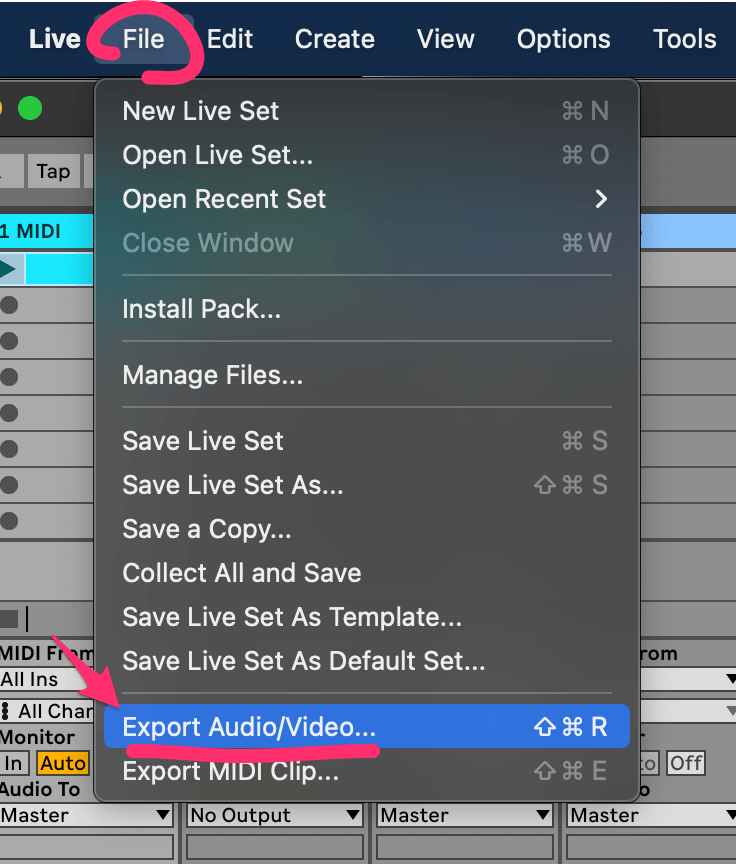
In the export menu, you will see an option named ‘Normalize’, which can be turned on or off.
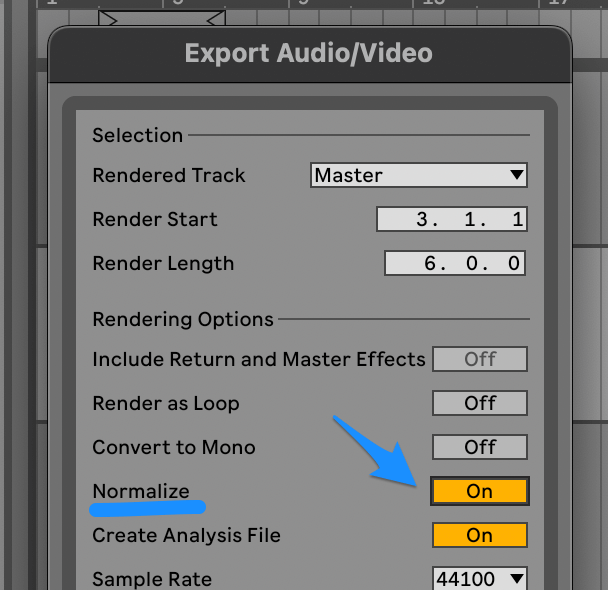
Note that there are no options to set the volume to anything other than 0db.
Having your audio at least a few db below zero is crucial if you’re wanting your track to be mastered post mixdown, as the mastering engineer will need this space (also known as ‘head room’) in order to enhance your audio.
Does Ableton individually normalize each session track?
Ableton’s normalizing process is done on the entire mixdown of the track and not each track individually.
So if the audio is increased in volume, it will be for the entire audio, not each track individually. Meaning that each track’s loudness will still be the same relative to each other as before normalizing was done.
Should I normalize to 0db?
If you’re wanting to send your recording to be professionally mastered, normalising to 0db is usually not the best idea.
In order for an engineer to enhance your track and make it sound as great as possible, they need some ‘headroom’ to work with.
Ideally you want to normalise to an absolute maximum of -3db in order to leave them the head space they need.
Don’t worry, the mastering process will make your track as loud as possible without compromising the dynamic quality of the track.
Does normalizing slow down track exporting?
Another thing to be aware of is that exporting a track with normalize turned on will significantly slow the export process down.
In some cases making it twice as long to complete, so if you leave it on all the time you can expect to be sitting around quite a lot longer waiting for your wav file to be generated.
Should I normalize audio when exporting?
If you have a ‘work in progress’ track and you quickly want to get it up to 0db for checking on various sound systems,
then the normalizing feature is a handy tool to achieve this without much thought.
Considering ‘Noise Floor’ when normalizing
Noise floor refers to the hiss/ noise which is recorded with a sound.
If the volume of your audio is pretty close to 0db then normalizing is ok to do.
However, if the audio is quite low then normalizing will raise the noise floor considerably, meaning that in raising the level of the recording, any hiss/noise will also be raised and be more prominent. If this is quite loud, then you may want to try reducing background noise from the audio first.
Bonus tip: How to normalize an individual clip in Ableton
Aside from normalizing the entire track during export, what if you want to just normalize an individual sample?
Here’s a trick for normalizing individual clips/samples in your Ableton session.
During consolidation of an audio clip, Live actually normalizes the individual clip.
Consolidating a clip is done by right clicking the clip > click ‘Consolidate’
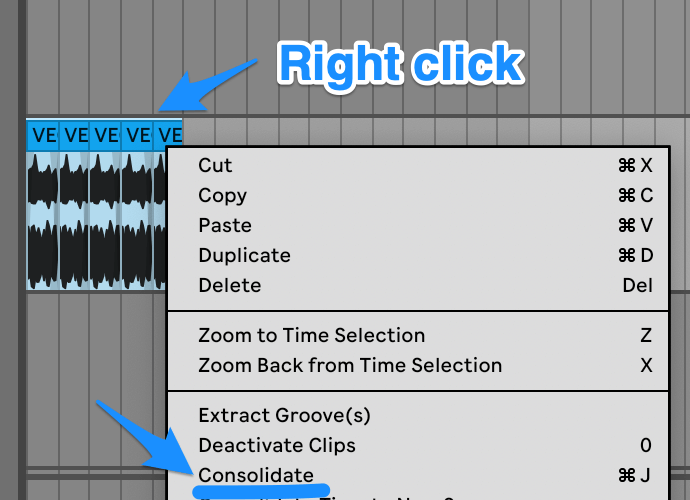
Once consolidating is complete, Live automatically reduces the volume of the normalised clip/sample back to where it was before consolidating but you can quickly set this to 0db.
- Open the clip’s properties and double click the ‘gain’. This will set the gain to 0db and your clip is now normalized.
- Live will have automatically turned on the ‘warp’ setting during consolidation, so also turn this off.
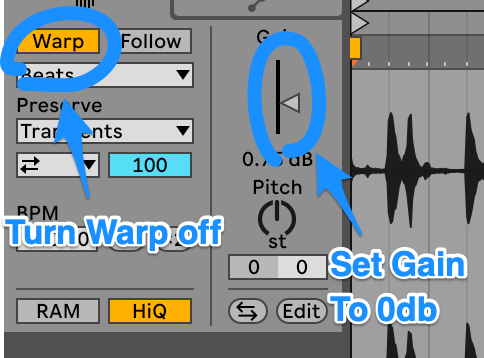
You’ll now have a normalized clip!
Video Tutorial
Steps to normalize a clip
Bonus tip 2: How to normalize MIDI velocity in Ableton
As appose to normalizing the volume of a clip or track in Ableton, it’s also possible to normalize the velocity of a midi clip.
Ableton has a midi effect called ‘Velocity’ which you can use to do this.
Drop an instance of Velocity on your midi track, set it to ‘fixed’ mode, and then you can set the exact velocity that you want your clip to use.
If you’re using Simpler, Sampler or impulse as your midi instrument, setting the vol/vel parameter to zero will cause all notes to play at the same volume regardless of how hard you hit the pad or piano key.
And the final way is, if you have already recorded your midi and simply want to set all of the notes to the same velocity,
Click on the midi clip, press cmd/ctrl + A to select all of the midi notes, then you can click and drag all of the velocities to the top/bottom which will put them all inline together, making them the same velocity (Live 11).
Then you can move them all to your desired velocity.
Can I use a Compressor and Limiter as an alternative to normalizing?
Using a compressor and limiter to raise the overall volume of your track may seem like a better option as you have many more options, but using these options is very different to normalizing.
Although a compressor can easily raise the volume of your overall audio, using one on your master track will actually change or ‘color’ the sound. Rather than simply raising or lowering the overall volume, a compressor can lessen or intensify aspects of the audio which can completely change the whole feeling of your carefully mixed track.
However, using a limiter is a slightly safer option i.e. it can be a good idea to ‘smooth out’ some of the excessively high peaks in your track by putting a soft limiter on the master channel.
It’s worth learning how to use a combination of compression and limiting on your channels as in doing this you’ll gain extra headroom in the mix.
Pros and Cons of using a Compressor and limiter to normalize audio
| Pros | Cons |
|---|---|
| Smooth out excessively high peaks | It colors the sound |
| Mor options than normalizing | Both methods (Compressor and limiter) alter the audio |
What is Clipping?
Watch out for clipping when normalizing, limiting or compressing your tracks.
Clipping occurs when the audio signal of a recording goes over the allowed threshold (this is usually zero db unless you are limiting it to a lower value).
Inter-sample peaks can occur when you’re producing near to 0db and you come to mixdown.
The combination of each track’s peak combined, can cause the overall audio volume to be raised over 0db resulting in a ‘clipping’ effect.
The audible effect of clipping is a noticeable distortion or ‘fuzzy’ sound in the audio. It’s generally advised to produce at a much lower volume in order to stay well below 0db. Making this into a habit will help you in the long run when it comes to mastering.
Alternatives to using Ableton’s Normalize option
As the options with Ableton’s normalizing are pretty limited (it doesn’t have any options other than to simply normlize!), if you’re looking for something more in-depth which you can dial settings in to your own taste, such as setting the db threshold, then an external editor may be the way to go.
To use an external editor for normalizing, you would first need to export your track from Ableton (with normalizing turned off), then load this exported file into your editor of choice.
There are a range of editors available which you can use, that come in both free and premium flavours:
| Free | Premium |
|---|---|
| Audacity | Izotope RX Elements |
| Ocean Audio | Sound Forge Pro |
How to normalize with Audacity
Possibly the most popular free audio editor in the world, Audacity, has a simple way to normalize an audio file.
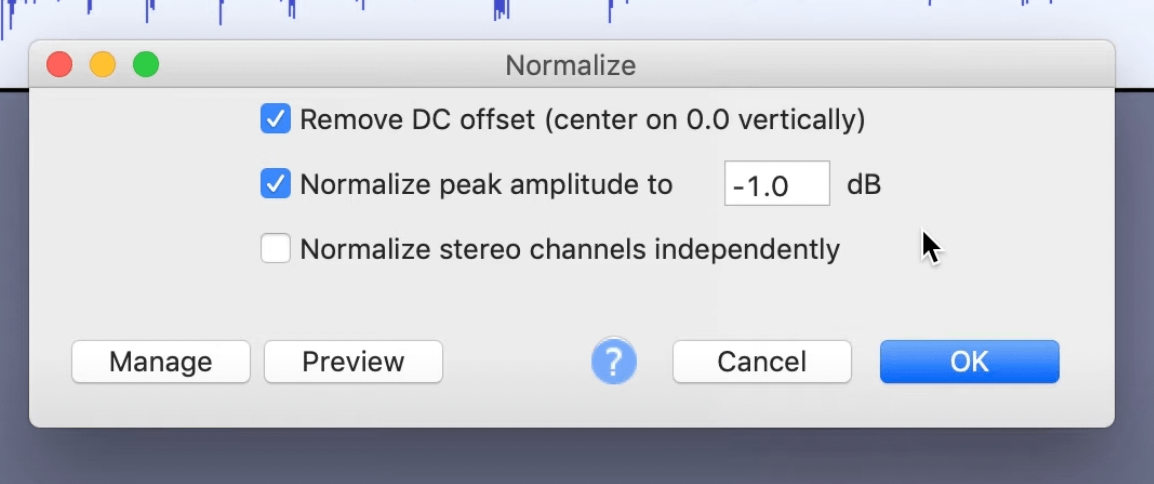
With your file loaded into the software, hit cmd/crl + A to select the entire file, then go to the effect tab at the top > then click normalize.
The normalize window which appears gives you a few options, including the ability to set the peak db to normalize to.
How to normalize with Ocean Audio
Ocean Audio is a lesser know but really powerful audio editor that doesn’t get the credit it deserves.
Normalizing in this is just as easy, and the process is pretty much the same as Audacity.
Hit cmd/ctrl + A to select the entire audio file > open the effect menu at the top, the click normalize.
How to normalize with Izotope RX Elements
Izotope RX Elements is more than just an audio editor, it also has many great audio repairing features including de-clipping and de-noising sounds in your audio file.
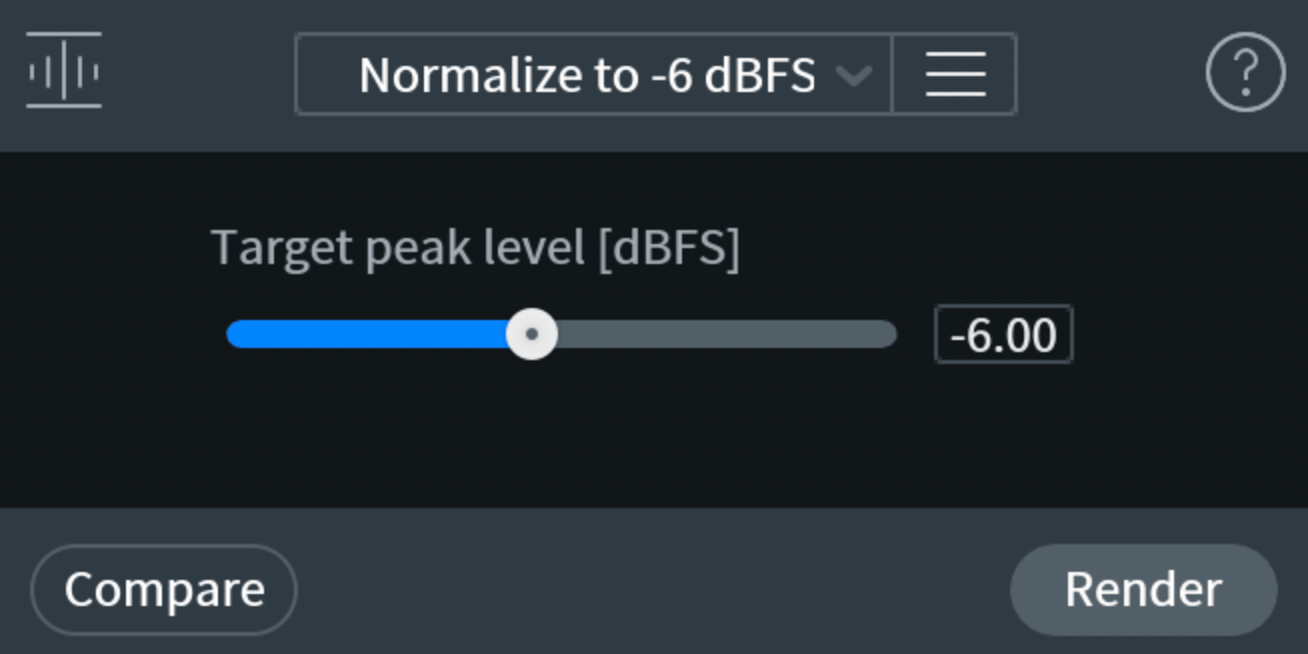
Normalizing can easily be done by clicking the ‘normalize’ module in the ‘utitliy’ section on the right.
The normalize window gives you the option to set your ‘Target Peak Level’ in decibels.
Then click ‘render’ to apply your normalized setting to the audio.
How to normalize with Sound Forge Pro
Another extremely powerful audio repair and editor. Normalizing can easily be done in Sound Forge Pro like this:
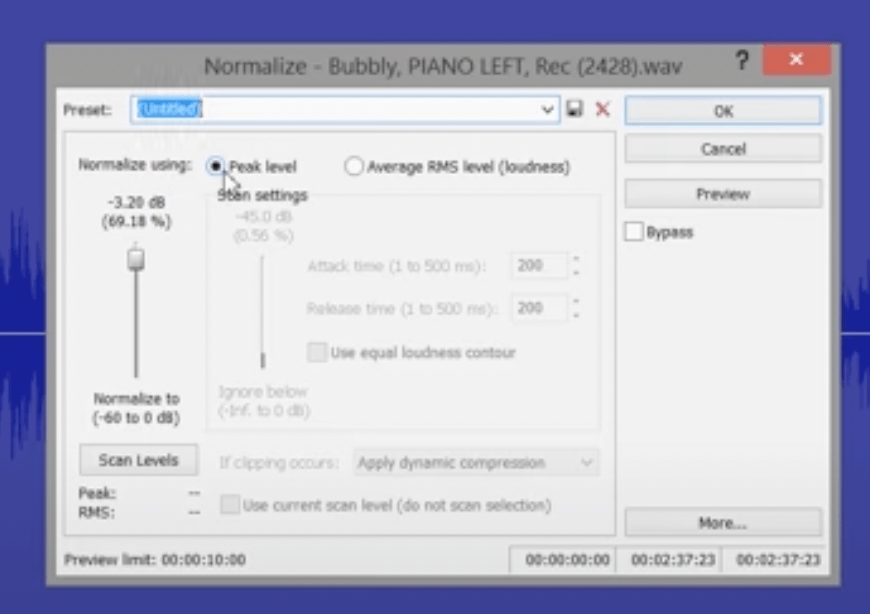
Select the entire audio file using cmd/ctrl + A, select ‘Process’ then ‘Normalize…’
Set your normalize db, click ‘peak level’ then click ‘ok’.
Pro Tip: Using an external Editor for normalizing with Ableton Live
Instead of getting the external editor to do the actual normalizing. Another way to go about it is to have the editor only analyze the audio.
Then use the data it gives you and make the actual adjustment inside Live. For example, in Izotope RX there’s an option called ‘Waveform Statistics’ which gives you a ‘true peak level’ of the entire track. Use the peak level information and make the actual adjustment inside your Ableton session.
So if for example, you want the peak to sit at zero db and Izotope RX tells you that the true peak level is currently at -3.2db. Then you can go into your Ableton session and raise by 3.2db and you will have a normalized track!
But be Cautious with this method!
As you’re dealing with two separate pieces of software then the calculations between them may vary slightly.
WIth this in mind it would be advisable to slightly lessen the amount which you raise the gain by, just to be sure you don’t go over 0db.
Wrapping Up
Although Ableton Live has a normalize option when exporting a track, as there’s no way to lower the peak to something less than zero db we recommend only using this for quick ‘work in progress’ test situations, not the final mix.
If you feel that you absolutely must normalise and are wanting to have your track mastered, then maybe it’s better to look at one of the external editors listed above. If you want to use a free tool, try Audacity, if you want something more feature rich take a look at Izotope RX Elements or Sound Forge Pro, both are awesome feature rich tool for audio repair.
We hope that you have found this article useful, for more in-depth guides on using Ableton Live, check out our blog.
If you use midi controllers with your Ableton Live setup, take a look at our midi mapping tool for Ableton.
