No products in the basket.
John here from Remotify.io! In this tutorial, I’ll show you three ways to install MIDI Remote Scripts into any version of Ableton Live.
The first two methods involve manual installation (copy and pasting folders),
and in the third method, I’ll show you how to enable 1 click MIDI remote script installation using Control Surface Studio.
Prerequisites
Before we begin, make sure you have downloaded to your computer, the MIDI Remote Script which you want to install into Ableton Live.
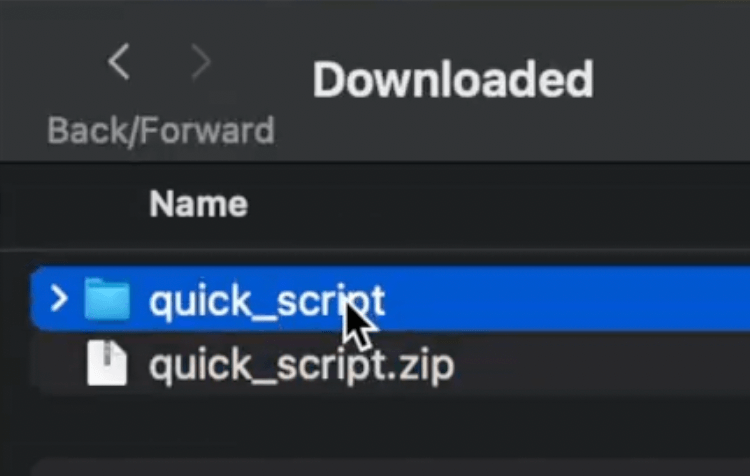
Usually, the script will be contained in a zip folder, unzip it.
After unzipping it, you will see the midi remote script folder, with its python files contained inside. This is the folder which we will be installing into Ableton.

Method 1: Using Ableton Live’s Browser
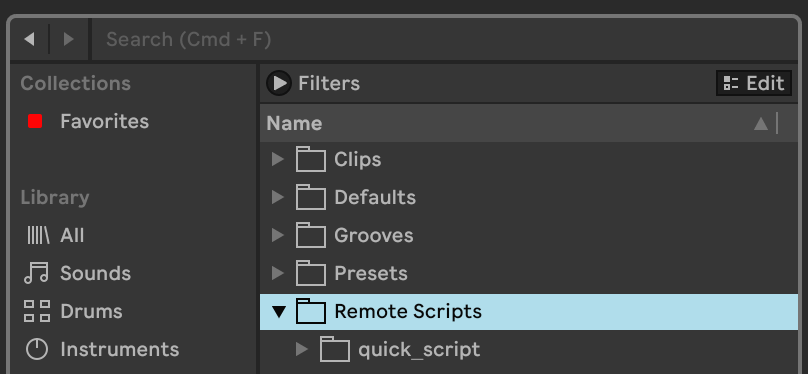

Since version 10.1.13 of Ableton Live, you can add MIDI Remote Scripts via the Ableton Live browser. Here’s how:
- Open User Library: In Ableton Live, open the User Library.
- Create Remote Scripts Folder: Add a new folder named “Remote Scripts” in the User Library.
- Drag and Drop: Drop the MIDI Remote Script folder into this “Remote Scripts” folder.
- Restart Ableton Live: Close and re-open Ableton Live (this is required in order for the script to be read by Ableton Live).
- Access Preferences: Open the Link, Tempo & MIDI Tab in the settings menu (or preferences menu in earlier versions of Ableton Live – 9, 10, 11).
- Select The Script: You should see the MIDI Remote Script as an option in the list of Control Surfaces.
Configure The MIDI Remote Script
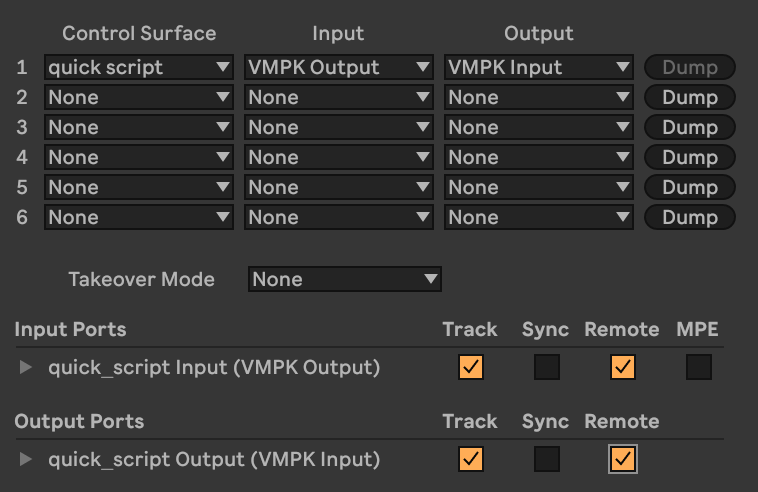

- Connect your MIDI controller to the computer,
- Select it in the input and output menus
- Check the appropriate options for ‘Track’, ‘Remote’, and ‘Sync’ boxes.
Track: When checked, this allows MIDI notes and CC messages to be sent/received.
Sync: This option enables MIDI clock syncing between Ableton live and the external device.
Remote: Allows external MIDI controllers to remotely control parameters within Ableton Live. - Unless otherwise stated by the creator of the midi remote script, generally, checking Track & Remote for both the input and output ports is best.
If the script hasn’t appeared in the ‘control surfaces’ menu, try the next method…
Method 2: Adding a Script via Live’s Resources Folder
This method involves placing the script in the folder where Ableton Live stores its default MIDI Remote Scripts.
Although it’s slightly more complicated than the first method, it works consistently for all users.
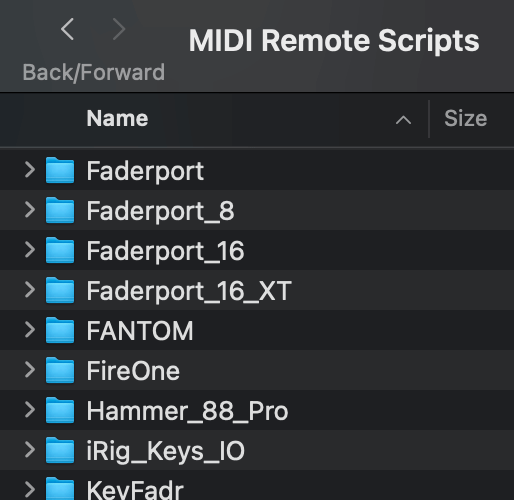

For Windows Users:
- Navigate to Folder: Open Explorer and go to
\ProgramData\Ableton\Live x.x\Resources\MIDI Remote Scripts. - Drop Script Folder: Drop the MIDI Remote Script folder into the ‘MIDI Remote Scripts’ directory.
For macOS Users:
- Show Package Contents: Open Finder, locate the Ableton Live application (usually in the Applications folder), right-click on it, and select “Show Package Contents”.
- Navigate to Folder: Go to
/Contents/App-Resources/MIDI Remote Scripts/. - Drop Script: Drop the MIDI Remote Script folder into this directory.
- Restart Ableton Live: Close and re-open Ableton Live.
- Access Preferences: Open the Link, Tempo & MIDI Tab in the settings menu.
- Select Script: The script will appear in the list of control surfaces. Configure your MIDI controller as described in Method 1.
Method 3: Using Control Surface Studio
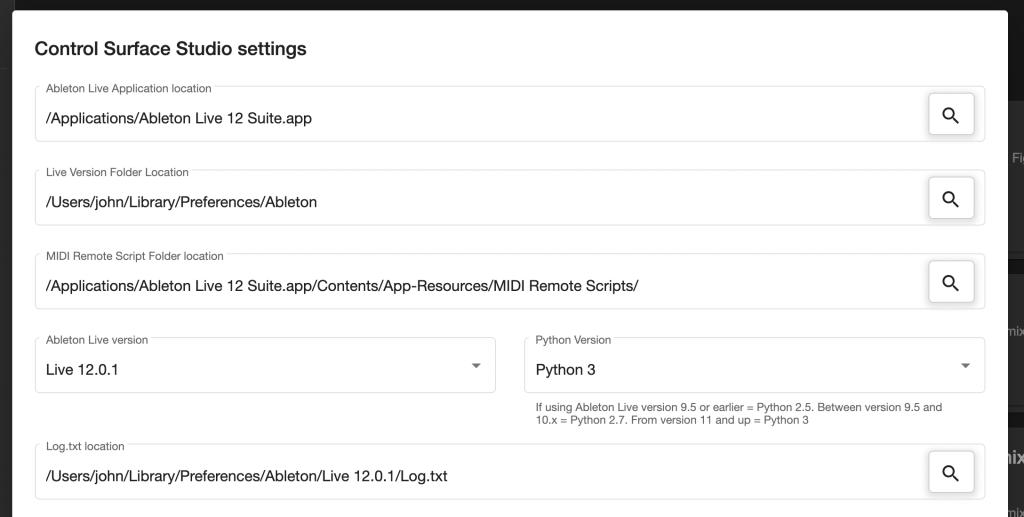

If you have used Control Surface Studio to create your custom MIDI Remote Script, installing it into Ableton is done with a single button press.
If this is your first time creating a custom script with the App, first you will need to configure the Settings. Here’s how:
- Open App Settings Menu: Open the App settings menu in Control Surface Studio (in the left column after logging in).
- Locate Ableton Live Application: For the ‘Ableton Live Application Location’ field. Click the magnifying glass button to the right, which opens the file browser, then find your Ableton Live installation. Select it, and click ‘open’.
- Set Locations: ‘Live version folder location’ and ‘MIDI Remote Script folder location’ will then be automatically set.
- Set Live Version: Select the Live version which you’re currently using, and the correct Python version will be selected automatically. Then click save.
- Generate Script: Open your custom script in the editor and click ‘generate script into Ableton Live’ (the big round orange button). The script will be automatically generated and installed directly into Ableton Live.
- Restart Ableton Live: Close and re-open Ableton Live. The script will be available in the control surfaces menu. You can then follow the configuration settings which were detailed in method 1.
- Script Prefixes: Scripts created by Control Surface Studio are prefixed with ‘css_’. This is done in order to prevent accidental overwriting of the default MIDI remote scripts which come with Ableton Live.
- Status Alert: When you activate a midi remote script which was created using Control Surface Studio, an alert will will display at the bottom.
Conclusion
MIDI Remote Scripts add powerful functionality to your MIDI controller that can’t be achieved with Ableton Live’s internal mapping mode alone.
Control Surface Studio enables you to build custom MIDI Remote Scripts with your own mappings, for any MIDI controller, without needing to write a single line of Python code.
Visit Control Surface Studio to learn more about creating your own custom MIDI Remote Scripts for Ableton Live.
