No products in the basket.
Contents
- Setup
- What are mappings?
- Creating your first mapping
- MIDI Controller Values
- MIDI learn
- Manual MIDI mapping
- Generating a working MIDI remote script
- Give your script a name
- Adding your script to Ableton
- Checking that your script works
In this basic step by step tutorial, I’m going to show you how to make your very own MIDI remote script.
In the past you would have needed to waste days/weeks/months learning how to write MIDI remote scripts by hand, but don’t worry you won’t be doing any coding in this tutorial.
Everything will be done using our simple MIDI remote script creator. Our App automatically generates all of the code for you, all you need to do is pick the functionality you need.
By the end of the tutorial, you’ll have a working script for your MIDI controller which will be set to control the volume on ‘track 1’ of your Ableton session view.
Sounds a bit simple right?
Yes it is but it’s actually a perfect starting point, after you’ve followed through this tutorial once, you’ll then have the knowledge to easily extend your script and add all of the other amazing functionality you need in order to create your perfect setup in your studio or on stage.
The most important part is being able to create a working script.
But what’s the point of creating a midi remote script in the first place?
Basically, you’re re-programming your Midi Controller to suit your own individual needs rather than what the manufacturer thinks you need.
Ok, lets get started…
Setup
What browser are you using?
Due to its implementation of ‘web midi’ I recommend using the Google Chrome Browser as you’ll then be able to take advantage of our ‘midi learn’ feature.
(Chrome is free, you can download it from https://www.google.com/chrome/browser/desktop. Alternatively, Opera is another option if for whatever reason you don’t want to use Chrome).
If you decide to proceed without using a web midi enabled Browser, later in the tutorial you’ll need to find out each individual midi message that your midi controller sends out which is borrrring.
I won’t judge you for using other browsers of course 🙂
(*I will)
Now, connect your chosen midi controller to your computer.
Also, Make sure you’re registered & logged into Remotify at http://remotify.io/user/login
Once logged in, go to the ‘app’ page http://remotify.io/app
Ready? great!
The first page you see is the ‘List’ page. This is where all of the ‘mappings’ you’ve created for your midi remote script will be listed.
What are mappings?
Mappings are the individual controls contained within a script, for example, a ‘mute’ button would be one mapping and a volume slider would be another.

They’re the ‘bricks’ and your midi remote script is the ‘house’.

As we haven’t created any mappings yet, the list page will be empty…so no house yet!

Time to create the first mapping for your script:
Creating your first mapping
Click the big blue button labelled ‘add a new mapping’ which will take you to the ‘mapping type’ page.

This is where you select the type of mapping you’d like to add to your script.
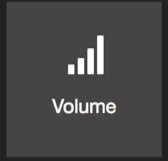
We’re going to create a mapping to control the ‘Volume’ on ‘track 1’ inside Ableton, so look for the row labelled ‘Mixer’ and click the ‘Volume’ button.
The next page you see (known as the ‘Mapping details’ page) is where you enter all of the information for the mapping that you’re creating.
In the box labelled ‘Name’ give your Volume mapping a name, it can be anything you like (i.e. bob smith) but I’d recommend something descriptive, so enter ‘track 1 volume’ in the box.
Next is ‘Track Type’, there’s 2 options you’ll see in here, ‘specific’ & ‘master’. If you select ‘specific’, this means you want your mapping to apply to a specific track inside Ableton.
In the ‘pro’ version you’ll also see an option called ‘selected’, this is for controlling the currently selected track inside Ableton. A great way to control every track if you have a small midi controller with only a handful of inputs available
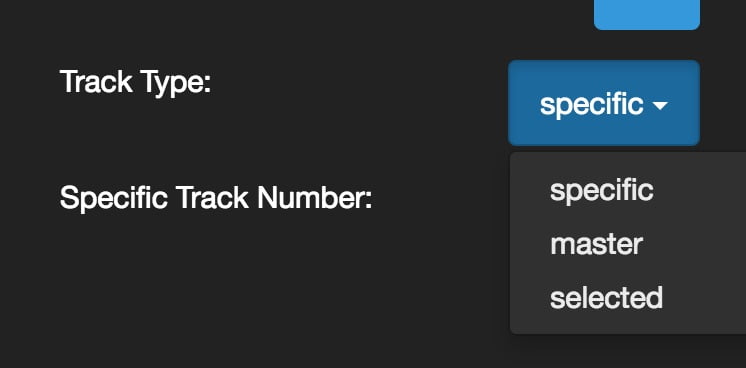
We want to assign our volume mapping to track 1, so select ‘specific’ if it’s not already done.
If you were to select ‘master’ here then your mapping would control the volume on the master track.
You should now see another select list appear titled ‘Specific Track Number’, select the track number you want your mapping to apply to – we want track 1.
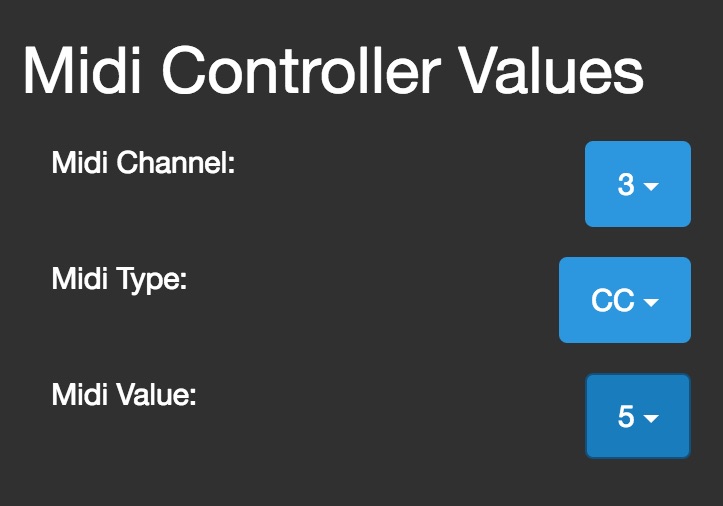
MIDI Controller Values
In the right side column, you will see a boxnamed ‘midi controller values’.
Up until this point you have been telling Remotify the functionality you want to control in Ableton – in our case, the volume on track 1.
Now we need to tell it which input on your midi controller you want to use for controlling the track 1 volume control.
and there are 2 ways to do this…
Midi learn (the quick way)
Remember at the start of the tutorial I recommended you to use Google’s Chrome browser?
If you took notice of me then its time for you to shine my friend!
Click the yellow ‘midi learn’ button and you will instantly see details of the mdi controller you’re using appear underneath.
For midi learn to work, ensure that “connection” says “open”.
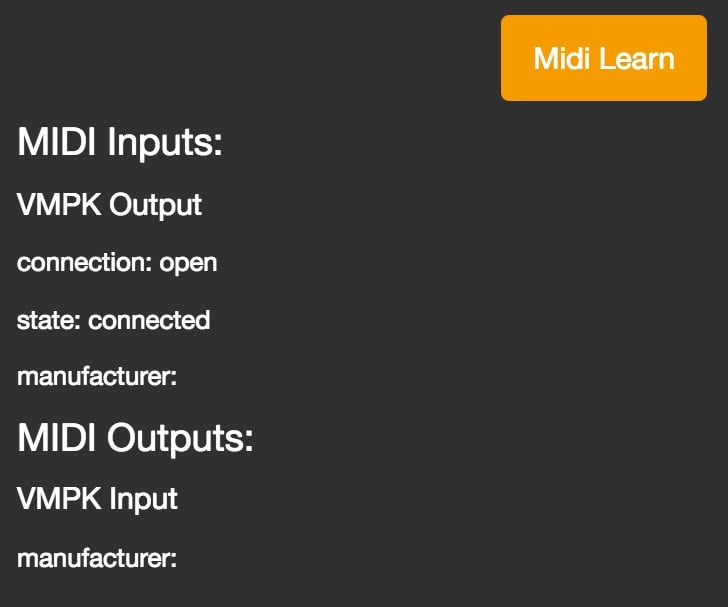
This means that Remotify has successfully detected your controller is ready to receive MIDI messages.
Now twist / push / pull an encoder / fader etc on your midi controller and you will instantly see the values inside the ‘midi controller’ box change.
Try moving some others on your controller and the values will keep updating.
What’s happing here? – Remotify is automatically inputting all midi information needed to assign a control on your device to a function inside Ableton.
When you’re finished playing with it, move the actual control you want to use so that Remotify inputs the correct values, then hit ‘Save’.
Manual midi mapping (the slow way)
If you’d prefer to manually input midi information rather than using ‘midi learn’ (maybe you’re a masochist?) this is also possible.
You just need to select the correct information for the 3 select lists – midi channel, midi type, midi value.
Try referring to the user manual of your midi controller for midi data info or google its schematics.
I also recommend a free application called MIDI Monitor (mac) or MIDI OX (windows) which work in a similar way to our ‘midi learn’ feature. When you move a physical input on your controller, the software will display its corresponding MIDI messages.
They’re also handy to have on you computer incase you need to debug your script.
You’ve successfully created the first mapping for your script
After hitting save, you’ll arrive back on the ‘list’ page, which is where we started.
But now you should see the mapping that you just created in the list…
The first brick has been laid for your house!

Let’s now turn your mapping into a working midi remote script…
7. Generating a working MIDI remote script
Rather than creating a whole bunch of mappings, we’re going to cut to the chase and generate a remote script.
It will only contain our volume mapping but that’s enough to test inside Ableton Live.
This is a good practice when you first start out as its easier to identify a problem if your script doesn’t work (test early & test often!).
Scripts can break for a variety of reasons, i.e. code error, incorrect Ableton midi configuration or even hardware issues and creating a bunch of mappings right away only increases the difficulty in tracking the problem down.
8. Give your script a name
You can name it however you like (ensure the name begins with a letter and not a number or anything else) but something I do is to prefix my scripts with the word ‘remotify’ so I can easily find my custom scripts in the ‘midi remote scripts’ folder of Ableton at a later date.
We will call our script ‘remotify volume control’
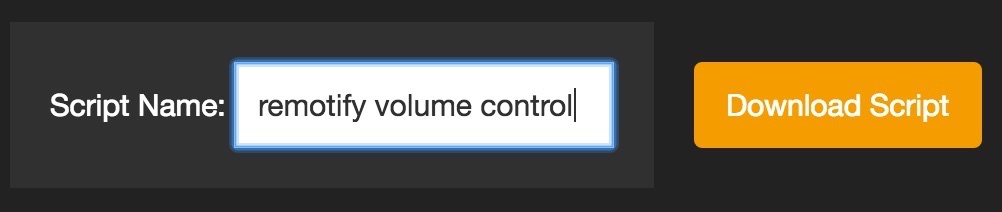
Hit the ‘Download Script’ button
Your script will now be automatically generated and downloaded to the ‘downloads’ folder on your computer.
If this worked successfully, a green message box will display at the top of the Remotify page which says ‘Your Remotify script was successfully generated!’
If it couldn’t be downloaded, a red message box will appear detailing what the problem is. Follow the instructions then try downloading again.
Adding your script to Ableton
Now that we have our ‘remotify volume control’ script on our computer, we just need to put it in to the folder which contains all of Ableton Live’s MIDI remote scripts.
We have a separate page which explains how to install your midi remote script into Ableton.
Follow the steps on that page then come back here…
Yay, you’re back! if you’re reading this then you have your midi remote script successfully installed into Ableton and have assigned it to your midi controller.
All that’s left is to test out is your volume mapping:
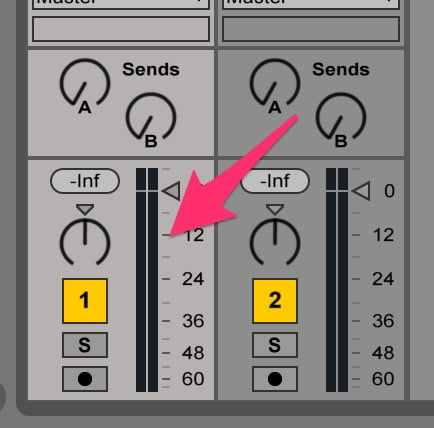
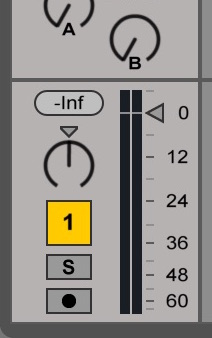
Make sure track 1 in Ableton has the track volume slider displayed (blank midi tracks don’t display it)
Checking that your script works
Move the input on your midi controller which you assigned to the volume control.
If you see the volume slider move inside Ableton then you’ve successfully created & installed a working midi remote script, woohooo!
Yes it’s a script which does only one thing (controls the volume) but to add more mappings is the exact same process.
The most important thing is that you have created a working script and now you can build on it.
Maybe you could now add a mute button on track 1. To do this simply scroll back up this tutorial to where it reads ‘Time to create the first mapping for your script’ and follow the process again but this time select ‘mute’ instead of ‘volume’ on the ‘mapping type’ page.
If your script failed to work, please have a read through our page on how to fix a broken remote script.
Have you considered upgrading to Pro? you get tons more mapping options. See the full list of Pro features here.